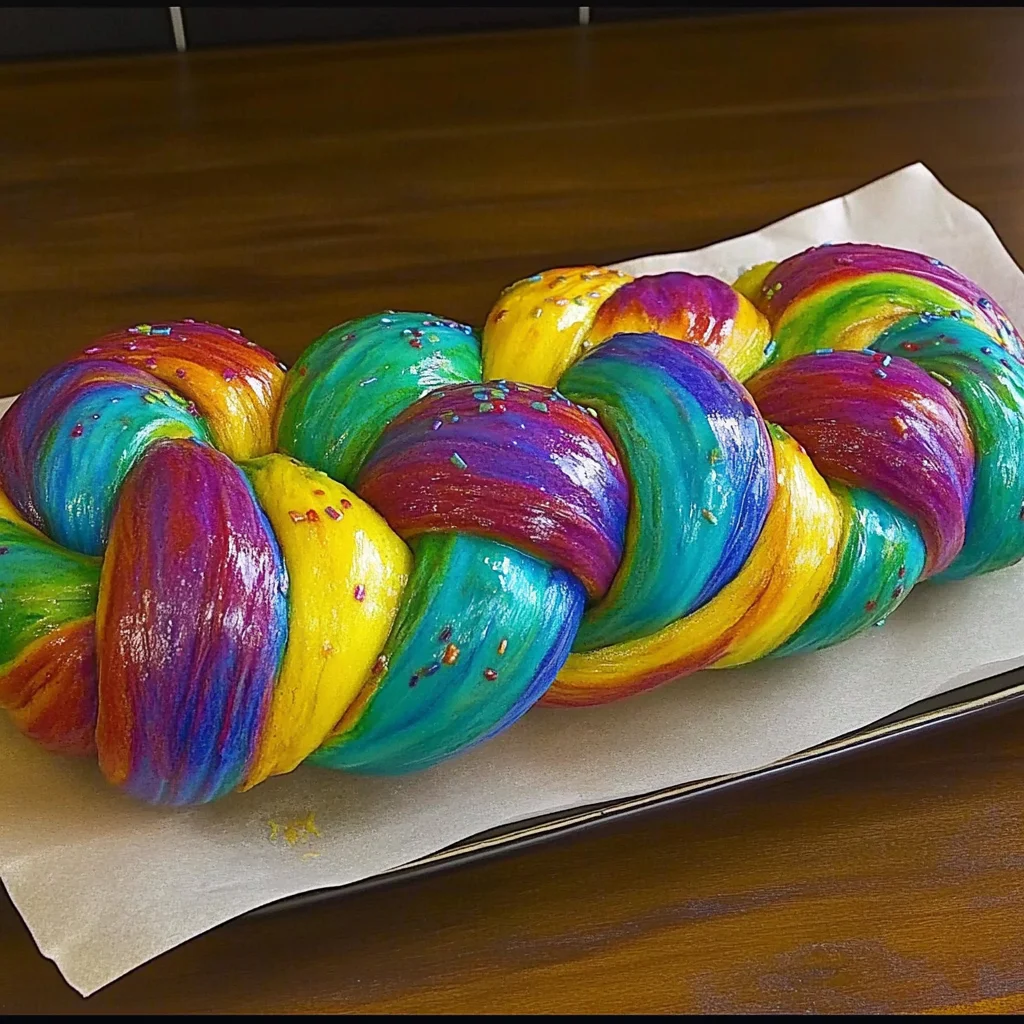
Imagine pulling apart a loaf of Rainbow Challah Bread, the vibrant swirls of color dancing before your eyes while a sweet, nutty aroma fills the air. Each bite reveals layers of fluffy texture, as if you’re tasting joy itself; it’s the kind of bread that turns any ordinary day into a celebration.
For me, baking this colorful delight is a cherished family tradition, often reserved for festive occasions when laughter and love fill the room. Whether it’s a holiday gathering or a simple Sunday brunch, the anticipation of sharing this eye-catching masterpiece always brings smiles and hungry hearts to the table.
Why is Rainbow Challah Bread so special?
This vibrant bread not only looks stunning but also bursts with flavor!
- Easy to make: Simple steps ensure everyone can join the fun.
- Versatile: Perfect for any occasion, from festive gatherings to cozy family dinners.
- Crowd-pleaser: Watch as it disappears at every gathering—everyone loves a slice!
- Unique twist: The colorful layers create excitement and joy in every bite.
Indulge in this delightful treat that turns any meal into a celebration!
Rainbow Challah Bread Ingredients
For the Dough
- All-purpose flour – a versatile base that gives the bread its soft texture.
- Active dry yeast – essential for that fluffy rise; make sure it’s fresh for best results.
- Sugar – enhances sweetness and helps activate the yeast for a beautiful rise.
- Salt – balances the flavors and strengthens the dough structure.
- Eggs – adds richness and color, contributing to that golden crust.
- Warm water – activates the yeast; remember, it should be around 110°F (43°C) to avoid killing it.
- Vegetable oil – keeps the dough moist and tender as it bakes.
For the Color
- Gel food coloring – provides vibrant hues; feel free to experiment with your favorite colors!
For the Glaze
- Egg wash (beaten egg with water) – gives your Rainbow Challah Bread a shiny finish when baked.
Enjoy this delightful twist on a classic treat that brings joy to any gathering!
How to Make Rainbow Challah Bread
1. Gather Ingredients: Start by collecting all your ingredients, including flour, yeast, sugar, and vibrant food coloring. This will make the process smoother and more enjoyable!
2. Mix Dough: In a large bowl, combine warm water, yeast, and sugar. Let it sit for about 5 minutes until frothy. Then add flour and salt to form a soft dough.
3. Knead Until Smooth: Turn the dough onto a floured surface and knead for about 10 minutes until it’s smooth and elastic. It should feel slightly tacky but not sticky.
4. Let it Rise: Place the dough in a greased bowl, cover it with a damp cloth, and let it rise in a warm place for about 1 hour or until it doubles in size.
5. Divide the Dough: Once risen, punch down the dough gently. Divide it into equal portions—typically six—to create colorful strands for your rainbow effect.
6. Color the Dough: Add different colors of food coloring to each portion of dough, kneading until the colors are vibrant and well-blended.
7. Roll Strands: Roll each colored dough portion into long ropes (about 12 inches). They should be evenly thick to ensure even baking.
8. Braid the Dough: Carefully braid the colored strands together, starting from one end and working your way to the other. Pinch the ends to seal them securely.
9. Second Rise: Place your braided loaf on a parchment-lined baking sheet. Cover it again with a cloth and let it rise for another 30-40 minutes until puffed up.
10. Bake to Perfection: Preheat your oven to 350°F (175°C). Bake the challah for about 25-30 minutes or until golden brown on top and sounds hollow when tapped.
Optional: Brush with melted butter for extra shine and flavor before serving!
Exact quantities are listed in the recipe card below.
Tips for the Best Rainbow Challah Bread
- Colorful Dough: Ensure each color of your rainbow dough is well-kneaded and vibrant. This ensures a beautiful, striking finish in your Rainbow Challah Bread.
- Even Braiding: Practice your braiding technique before starting. Uneven twists can lead to inconsistent baking and presentation, so take your time!
- Proper Proofing: Don’t rush the rising process. Allow the dough to proof until it doubles in size for a light and airy texture that everyone will love.
- Egg Wash Shine: Use an egg wash before baking for a glossy crust. This simple step makes your Rainbow Challah Bread look professional and inviting.
- Cooling Time: Let your bread cool completely on a wire rack. Cutting too soon can lead to a gummy texture, so patience is key!
How to Store and Freeze Rainbow Challah Bread

- Room Temperature: Keep your Rainbow Challah Bread wrapped in plastic wrap or a bread box for up to 3 days to maintain its softness and freshness.
- Fridge: If you need it to last longer, store the bread in the fridge for up to a week. Just make sure it’s in an airtight container to prevent drying out.
- Freezer: For long-term storage, slice the challah and freeze it in a freezer-safe bag for up to 3 months. Thaw slices at room temperature or toast directly from frozen.
- Reheating: To enjoy that fresh-baked taste, reheat slices in the oven at 350°F (175°C) for about 10 minutes, or until warmed through and slightly crispy.
Rainbow Challah Bread Variations Galore
Feel free to explore your creativity and tailor this delightful loaf to suit your taste buds!
- Dairy-Free: Substitute almond or oat milk for regular milk and use dairy-free butter. This keeps the dough rich while accommodating lactose sensitivities. Your family will love the subtle nutty flavor that complements the sweetness.
- Gluten-Free: Use a gluten-free all-purpose flour blend to make this recipe celiac-friendly. Just ensure you add a bit of xanthan gum for structure. It’s a fantastic way for everyone to enjoy this colorful treat without worry!
- Colorful Sprinkles: Mix in edible sprinkles into the dough before braiding for an extra festive touch. This adds fun and whimsy, perfect for birthdays or celebrations. The vibrant colors will make it even more visually appealing.
- Cinnamon Sugar Swirl: Incorporate a cinnamon-sugar layer before braiding for a spice twist. Simply sprinkle a mix of cinnamon and sugar on the rolled out dough, then roll it up tightly. The warm aroma will fill your kitchen, making it feel like a cozy bakery.
- Chocolate Chips: Fold in mini chocolate chips into the dough for a sweet surprise in every bite. This creates a delightful contrast with the bread’s softness and sweetness. Imagine pulling apart warm slices filled with melty chocolate goodness!
- Savory Herb Infusion: Add fresh herbs like rosemary or thyme into the dough for a gourmet twist. It transforms your rainbow loaf into an aromatic experience, perfect as an accompaniment for savory dishes. The unexpected flavor pairing will impress your dinner guests.
- Spicy Kick: Mix in some crushed red pepper flakes or jalapeños to infuse heat into the bread. This bold variation is ideal if you’re looking to add zest to your meal. It’s an adventurous take that will leave everyone wanting more!
- Fruit Fillings: Experiment with fillings like raspberry or apricot jam before braiding for fruity bursts throughout. This adds moisture and sweetness, creating a symphony of flavors in every slice. Your family will be surprised by the delightful surprises hidden within!
Make Ahead Options
Rainbow Challah Bread is an ideal choice for meal prep, allowing you to spend less time in the kitchen on busy days while still enjoying this colorful delight. You can prepare the dough up to 24 hours in advance; simply follow the recipe until the first rise, then cover it tightly with plastic wrap and refrigerate. Alternatively, if you need even more flexibility, shape your braided loaf and freeze it unbaked for up to 3 days. Just be sure to let it thaw in the refrigerator overnight before its final rise. To maintain that beautiful texture and flavor, brush it with an egg wash before baking. When you’re ready to enjoy your Rainbow Challah Bread, bake it directly from the fridge or allow it to come to room temperature for about 30 minutes if frozen. These make-ahead options not only save you time but also ensure your bread is fresh and fabulous!
Rainbow Challah Bread Recipe FAQs
What type of flour is best for making Rainbow Challah Bread?
Using all-purpose flour is ideal, as it provides the right balance of structure and tenderness. If you’re feeling adventurous, you can experiment with bread flour for a chewier texture. Just remember that this might slightly alter the final result.
How should I store leftover Rainbow Challah Bread?
To keep your Rainbow Challah Bread fresh, wrap it tightly in plastic wrap or aluminum foil and store it at room temperature for up to 3 days. For longer storage, place it in a resealable bag and refrigerate for up to a week. Just be aware that refrigeration can sometimes dry out the bread.
Can I freeze Rainbow Challah Bread?
Absolutely! To freeze your Rainbow Challah Bread, slice it first, then wrap each slice tightly in plastic wrap followed by aluminum foil. It will stay fresh in the freezer for about 2-3 months. When you’re ready to enjoy it, simply thaw at room temperature or pop a slice in the toaster for a quick warm-up!
What if my dough doesn’t rise properly?
If your dough isn’t rising, check that your yeast is fresh and active—proofing it in warm water with a little sugar can help determine its viability. Ensure your environment is warm enough; if it’s too cold, try placing the dough in an oven with just the light on or near a warm window. Patience is key here; allow extra time if needed!
Is Rainbow Challah Bread suitable for those with dietary restrictions?
While traditional Rainbow Challah Bread contains wheat and eggs, you can make it vegan by substituting flaxseed meal mixed with water for eggs and using plant-based milk. For gluten-free options, look for specific gluten-free flour blends designed for baking breads to achieve similar results.
How do I achieve vibrant colors in my Rainbow Challah Bread?
To get those eye-catching colors, use gel food coloring instead of liquid dyes—it won’t affect the dough’s consistency! Divide your dough into sections and knead each with different colors until fully blended. This makes it easier to create beautiful swirls when braiding!


