
There’s something magical about gathering around the table during Easter, with the scent of freshly baked cookies filling the air and the laughter of loved ones surrounding you. The aroma of buttery goodness combined with delicate hints of vanilla and almond creates a captivating backdrop for family memories that will last long after the cookies are devoured. This year, why not dive into the delightful world of **Fun and Easy Hand Painted Cookies for Your Easter Table**? Not only will these cookies dazzle your eyes, but they’ll also tickle your taste buds and leave everyone begging for seconds.
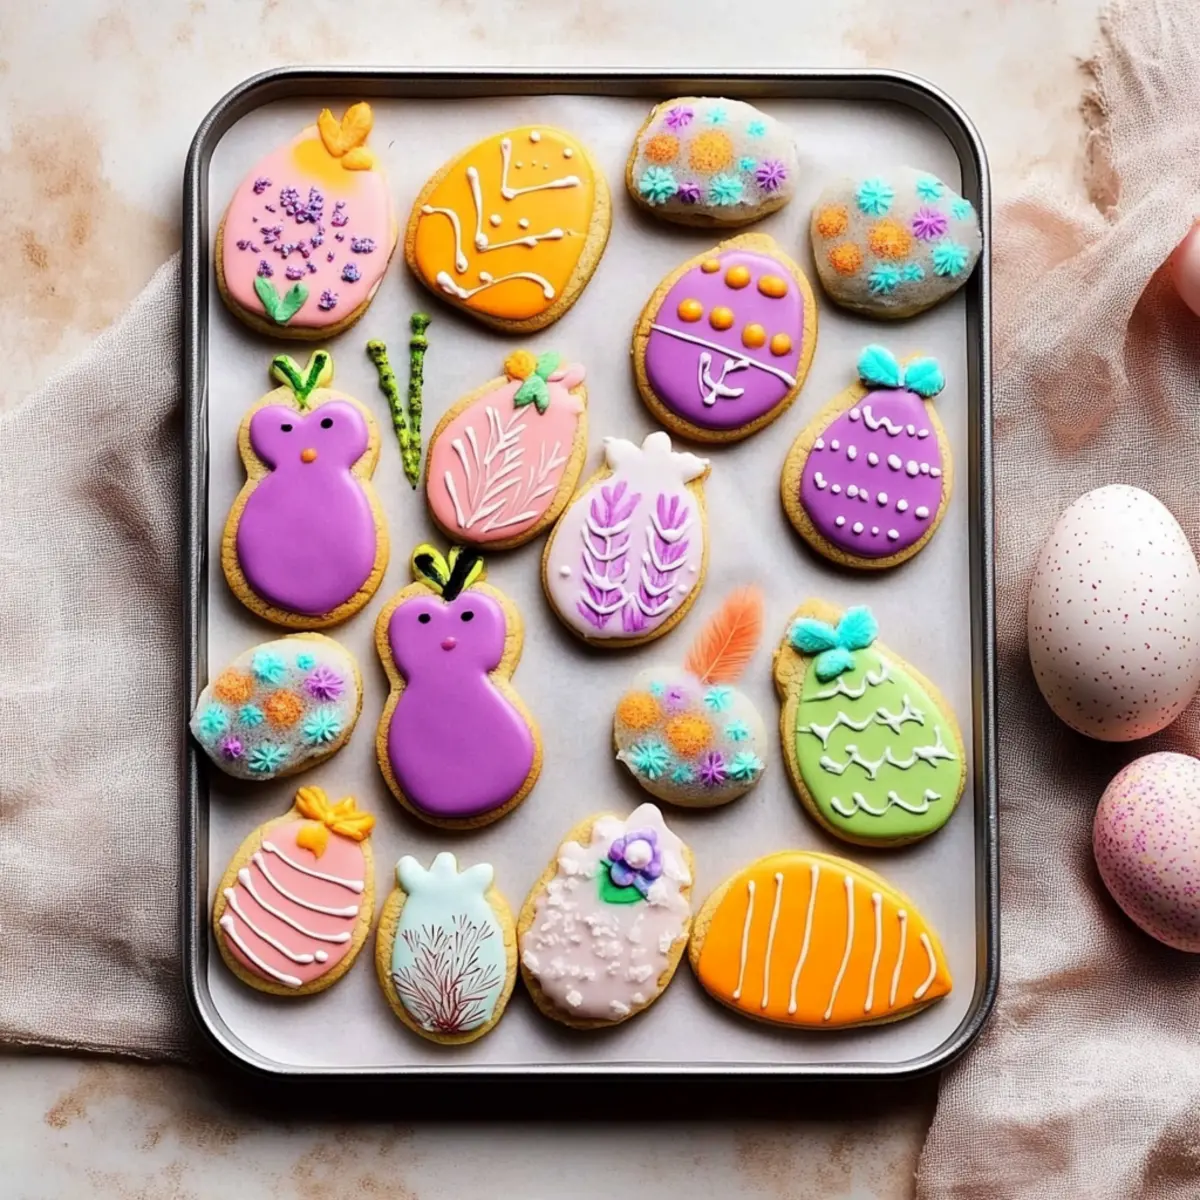
Picture this: a platter brimming with vibrant, hand-painted cookies shaped like bunnies, colorful Easter eggs, and whimsical carrots, all patiently awaiting their turn to shine. Each cookie tells a story, from the playful designs crafted lovingly with royal icing to the sweet flavor that dances on your palate. Making these treats embraces the essence of Easter, where creativity and joy thrive. Grab your rolling pin, don your apron, and get ready to impress with cookies that are as delightful to look at as they are to eat!
Why You'll Love This Fun and Easy Hand Painted Cookies for Your Easter Table
- This incredible Fun and Easy Hand Painted Cookies for Your Easter Table transforms simple everyday ingredients into restaurant-quality flavors that will blow your mind completely.
- Foolproof recipe techniques guarantee perfect results every single time, making even novice cooks feel like professional chefs instantly.
- Stunning visual appeal with gorgeous colors and mouthwatering aromas creates the ultimate Instagram-worthy dish for any special occasion.
- Endlessly adaptable for different dietary needs while working beautifully for meal prep, date nights, or entertaining large groups effortlessly.
Ingredients for Fun and Easy Hand Painted Cookies for Your Easter Table
Here’s what you’ll need to make this delicious Fun and Easy Hand Painted Cookies for Your Easter Table:
2 and 1/4 cups all-purpose flour – This forms the base of your cookie dough, providing structure and texture. Spoon it and level it off for perfect results.
1/2 teaspoon baking powder – This little leavening agent helps your cookies rise and maintain a soft texture.
1/4 teaspoon salt – Enhances the sweetness and balances flavors. Always a must in baking!
3/4 cup unsalted butter – Softened to room temperature for easy mixing, it adds richness to the dough.
3/4 cup granulated sugar – Sweetens the cookies and contributes to their delightful texture.
1 large egg – Binder and moisture provider, it works wonders in bringing all the ingredients together.
2 teaspoons pure vanilla extract – A flavor enhancer that infuses your cookies with warmth and sweetness.
1/2 teaspoon almond extract (optional) – Adds a subtle nutty flavor that elevates the overall taste of your cookies.
For Decorating
Royal icing or easy cookie glaze icing – Choose whichever you prefer for outlining and flooding your cookies.
Gel food coloring – Perfect for creating vibrant, eye-catching hues for your designs.
Sanding sugar sprinkles – Provide a delightful crunch and sparkle to your creations.
Mini marshmallows, halved – These make adorable bunny tails, adding a touch of whimsy to your decorations.
How to Make Fun and Easy Hand Painted Cookies for Your Easter Table
Follow these simple steps to prepare this delicious Fun and Easy Hand Painted Cookies for Your Easter Table:
Step 1: Combine Dry Ingredients
Whisk the flour, baking powder, and salt together in a medium bowl. This simple act ensures even mixing, allowing the baking powder to help your cookies rise perfectly.
Step 2: Cream Butter and Sugar
In a large bowl, beat the softened butter and granulated sugar together using a handheld or stand mixer fitted with a paddle attachment. Mix on high speed until the blend is creamy and smooth, about three minutes. This is the moment to add the egg, vanilla extract, and optional almond extract, mixing until well combined.
Step 3: Mix Wet and Dry Ingredients
Slowly add the dry ingredient mixture to the wet mixture, combining on low speed until everything comes together. If your dough feels too soft or sticky to roll out, just sprinkle in a bit of flour until it reaches the perfect consistency.
Step 4: Chill the Dough
Divide the dough into two equal portions and place each on lightly floured parchment paper. Roll out to a thickness of about 1/4 inch, then layer with parchment and chill in the refrigerator for at least 1–2 hours or up to two days. This step is key; it allows the flavors to develop and the dough to firm up for clean cutting!
Step 5: Bake the Cookies
When you’re ready to bake, preheat your oven to 350°F (177°C) and line your baking sheets with parchment paper. Remove the dough from the fridge, cut it into shapes with your favorite cookie cutters, and arrange them on the baking sheets with three inches of space between each one. Bake for 11-12 minutes or until the cookies are lightly browned around the edges. After baking, allow them to cool on the sheets for five minutes before transferring them to a wire rack to cool completely.
Step 6: Decorate!
Prepare your royal icing or cookie glaze icing as per your preference, utilizing piping bags or squeeze bottles for easy decorating. For bunnies and carrots, follow the outline and flooding technique using white icing; add that marshmallow tail and a sprinkle of colored icing for fun accents. For Easter eggs, divide the icing and coat with various colors, then unleash your artistic side with decorative designs after the icing has set. Serve these delightful cookies right away or wait until the icing hardens for an added crunch. Keep them stored at room temperature, and they’ll stay fresh for about five days.
With your Fun and Easy Hand Painted Cookies for Your Easter Table ready to impress, gather your loved ones, and let the joyful celebration begin! Don’t forget to snap photos of your beautifully decorated cookies before everyone digs in—after all, these are the Easter memories that will last a lifetime!

You Must Know About Fun and Easy Hand Painted Cookies for Your Easter Table
- This showstopping Fun and Easy Hand Painted Cookies for Your Easter Table delivers restaurant-quality results using simple ingredients you probably already have at home.
- The perfect balance of textures and flavors creates an unforgettable dining experience that will have everyone asking for seconds.
- Picture-perfect presentation with vibrant colors makes this dish absolutely Instagram-worthy and guaranteed to impress any dinner guest.
- Incredibly versatile recipe that works beautifully for weeknight dinners, meal prep, special occasions, or even outdoor entertaining sessions.
Perfecting Fun and Easy Hand Painted Cookies for Your Easter Table Cooking Process
Begin by preparing the cookie dough, allowing it to chill while you set up your workspace for decorating. Once the cookies are baked and cooled, prepare your icing and enhance with vibrant colors before decorating. This sequence ensures smooth workflow and delightful results.
Add Your Touch to Fun and Easy Hand Painted Cookies for Your Easter Table
Feel free to experiment with different extracts instead of almond, like coconut or lemon, for unique flavor profiles. You can also try adding citrus zest to the dough for a refreshing twist. Topping with crushed nuts or dried fruits offers extra texture and flavor.
Storing & Reheating Fun and Easy Hand Painted Cookies for Your Easter Table
Store your cookies in an airtight container at room temperature to maintain their soft texture for up to five days. If you’re looking to extend their life, freeze them between layers of parchment paper, then thaw at room temperature before enjoying.
Chef's Helpful Tips for Fun and Easy Hand Painted Cookies for Your Easter Table
- This professional-quality Fun and Easy Hand Painted Cookies for Your Easter Table relies on precise timing and temperature control to achieve restaurant-standard results consistently.
- Master the art of mise en place by prepping all ingredients beforehand, ensuring smooth execution and preventing any last-minute cooking disasters.
- The secret lies in layering flavors throughout the cooking process rather than seasoning only at the end for maximum depth.
- Pro tip: let the finished dish rest for optimal texture and flavor development before serving to hungry guests waiting eagerly.
After baking these cookies one Easter, my friends declared them the highlight of the gathering. One bite and you could see the joy on everyone’s faces; that’s what homemade cooking is all about.

FAQs About Fun and Easy Hand Painted Cookies for Your Easter Table
What is Fun and Easy Hand Painted Cookies for Your Easter Table?
Fun and Easy Hand Painted Cookies for Your Easter Table are delightful, whimsical cookies that bring a dash of creativity to your holiday celebrations. These cookies are made with a tender, flavorful dough that can be cut into various shapes, making them perfect for Easter themes. Decorating them with colorful icing, vibrant sprinkles, and fun designs transforms these baked goods into eye-catching table centerpieces. Ideal for family gatherings or as gifts, they add a personal touch to the festive season.
How do you make the icing for Fun and Easy Hand Painted Cookies for Your Easter Table?
To make the icing for your Fun and Easy Hand Painted Cookies for Your Easter Table, combine powdered sugar, egg whites, and lemon juice to achieve a smooth icing consistency. For a cookie glaze, thin the icing with milk to make it pourable. Divide the icing into separate bowls and tint them with gel food coloring for vibrant hues. This will allow you to create beautiful designs, perfect for outlining and flooding your cookies, replicating the charm of hand-painted artistry.
Can I customize flavors in Fun and Easy Hand Painted Cookies for Your Easter Table?
Absolutely! One of the joys of baking Fun and Easy Hand Painted Cookies for Your Easter Table is the ability to customize flavors. You can swap out the almond extract for other options like lemon, orange, or coconut for a zesty twist. Additionally, adding citrus zest to the dough not only enhances flavor but provides extra aroma that will make the cookies even more irresistible. The flexibility in flavors allows you to cater to different tastes and preferences.
How should I store Fun and Easy Hand Painted Cookies for Your Easter Table?
To keep your Fun and Easy Hand Painted Cookies for Your Easter Table fresh and delicious, store them in an airtight container at room temperature. They will maintain their soft texture for about five days. If you want to extend their shelf life even more, consider freezing the cookies. Place layers of parchment paper between them in a freezer-safe container, allowing you to enjoy these treats even weeks after making them.
Conclusion for Fun and Easy Hand Painted Cookies for Your Easter Table
In summary, Fun and Easy Hand Painted Cookies for Your Easter Table are a delightful addition to any holiday gathering. By following simple steps and using vibrant decorations, you can create showstopping cookies that impress your guests. Customize the flavors to your liking, and don’t forget to store them properly to maintain freshness. Baking these cookies can bring warmth and joy to your celebrations, ensuring that everyone remembers the special moments shared around the table.
Fun and Easy Hand Painted Cookies for Your Easter Table Recipe
Ingredients
Equipment
Method
- Whisk the flour, baking powder, and salt together in a medium bowl. Set aside.
- In a large bowl, beat the butter and sugar together on high speed until smooth and creamy, about 3 minutes. Add the egg, vanilla, and almond extract, beating until combined.
- Add the dry ingredients and mix on low speed until combined. If the dough is too soft, add 1 more tablespoon of flour.
- Divide the dough in half and roll each portion out to about 1/4-inch thickness on floured parchment paper. Refrigerate for at least 1-2 hours.
- Preheat oven to 350°F (177°C). Line baking sheets with parchment paper. Cut shapes using cookie cutters.
- Arrange cookies on baking sheets spaced 3 inches apart. Bake for 11-12 minutes until lightly browned. Cool on wire racks.
- Prepare icing using powdered sugar, egg whites, and lemon juice. Tint with gel food coloring.
- Decorate cookies with icing and sprinkles. Allow icing to set before serving.


